Keywords
Pack boronizing; Boride layers; Wear resistance; Hardness; COF
Introduction
Pack-boronizing provides specific advantages over other techniques like, easy and less handling equipments, possibility of changing composition of boronizing powder mixture and low cost of the process. Boronizing is a thermo-chemical surface treatment process that involves diffusion of boron atoms into the surface of metal/alloy to produce a layer of borides of the corresponding metal/alloying elements [1-3]. The major advantages of surface treatment by boronizing are its ability to impart high hardness (between 1450 and 5000 HV), low surface coefficient of friction (COF), excellent abrasion and wear resistance and oxidation resistance compared with other similar treatment [2,4]. Tool steels, particularly the H type, are commonly used in many industrial applications. The process involves heating well-cleaned material in the range of 700 to 1000°C, preferably for 1 to 12 hr, in contact with a boronaceous solid powder (boronizing compound), paste, liquid or gaseous medium. Generally, the commercial boronizing mixture is composed of boron carbide (B4C) as donor, KBF4 as an activator and silicon carbide (SiC) as a diluent to control the boriding potential of the medium. Components are packed in the container with above mixture and heated in the boronizing temperature range for specific time to form borides on the steel surface followed by cooling in air [5]. Diffusion of boron into the surface of metals and alloys forms metallic borides, such as FeB and Fe2B, depending on process temperature, chemical composition of substrate materials, boron potential of the medium and boriding time. The thickness of compound layers consisting of FeB and Fe2B boride can reach up to 60-100 μm. The morphology of the boride layer is influenced by the presence of alloying elements in the matrix. Formation of either single phase or two phase layer depends upon the availability of boron (boron potential) in the boronizing media, process temperature and time. Boron-rich FeB phase with 16.23 wt.% boron has orthorhombic crystal structure while monophase Fe2B has body central tetragonal structure with 8.83 weight% boron. FeB is more brittle compared to Fe2B [5-7], and Fe2B is more desirable than FeB. Crack formation is generally observed at the interface of FeB/Fe2B due to the difference in their crystal structures and coefficient of thermal expansion. Owing to the high alloying of tool steels, other elements also can easily form the borides in the layers, especially Cr, if the alloy contains sufficiently high amount of chromium [8-10]. The current study focuses on boronizing of AISI H13 steel for die insert application to improve wear resistance and performance evaluation with existing nitro-carburized die insert.
Experimental Method
Specimen preparation
In the current study, AISI H13 steel specimens were used. The chemical composition of AISI H13 steel is given in Table 1.
| Elements |
C |
Mn |
Si |
Cr |
Ni |
Mo |
V |
S |
P |
Fe |
| Weight % |
0.385 |
0.355 |
1.049 |
5.11 |
0.152 |
1.278 |
0.993 |
0.001 |
0.014 |
Remaining |
Table 1: Chemical Composition of AISI H13 steel.
Four disc shaped specimens with dimensions of 20 mm (diameter) X 5mm (thickness) were prepared. The specimens were cleaned with soap solution and then with acetone solution. Specimens were etched by using 2% Nital.
Container design
Mild-steel container was designed for boronizing treatment. The container was cylindrical-shaped with dimensions (diameter X height X thickness) of 100 mm × 150 mm × 5 mm. During the experiment, oxidation and descaling of the container wall was observed.
Boronizing process
Specimens to be boronized were packed in the mild steel container. The pack mixture typically contains ‘‘BoropakTM’’ boronizing powder mixture and SiC as diluent. Boronizing powder mixture could be B4C+KBF4+SiC. Bottom of the container was filled with 15 mm layer of the SiC powder followed by a 15 mm layer of boronizing powder mixture (BoropakTM). Cleaned specimens were kept on top of the boronizing powder and then, container is filled with boronizing powder mixture (15 mm thick layer) and SiC (15 mm thick layer) on the top. After this packing, 20-25 mm thick layer of glass powder was filled to avoid oxidation or contact of air with the powder mixture and specimen. Three specimens were heated at 950°C for 0.5 hr, 1 hr and 2 hr respectively. One sample was nitocarburized at 550°C for 12 hr. Containers were air cooled after boronizing.
Characterization of specimens
Microstructure of cross section of the specimens was studied by using SEM. Coating thickness of boronized specimens was measured by using optical micrographs. Coating thickness was measured at 10 different locations on the cross section of specimens. Five readings were taken at each location, and arithmetic average of these readings was reported in the subsequent sections. Nitrocarburized specimen was also studied. Hardness-depth profiles across the cross section of boronized and nitocarburized specimen were obtained by using Vickers microhardness tester.
Pin on disc test procedure
For each treatment (i.e., nitrocarburizing and boronizing), three pins were made for each load and the arithmetic average of their results was reported. Wear testing parameters are shown in Table 2.
| Parameters |
Selected Value |
| Load, (N) |
30, 90 |
| Velocity, (m/s) |
1 |
| Temperature, °C |
300 ± 5 |
| Test pin diameter, (mm) |
10 |
| Environment |
Air |
| Total distance (m) |
4000 |
| Humidity (%) |
46 ± 5 |
| Disc Hardness (HRC) |
62 |
| Disc surface roughness, (Ra, µm) |
0.25 ± 0.03 |
Table 2: Pin on disc wear and friction test parameters.
Results and Discussion
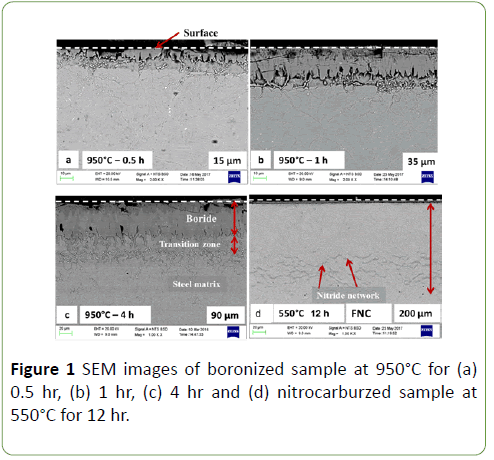
Figure 1 shows the SEM image of the specimen boronized at 950°C for 0.5 hr, 1 hr, 4 hr and nitrocarburized sample. At boronizing temperature, there is formation of potassium trifluoride (BF3) gas from KBF4 activator and this gas reacts with boron yielding substance B4C, to generate boronizing atmosphere.

Figure 1: SEM images of boronized sample at 950°C for (a) 0.5 hr, (b) 1 hr, (c) 4 hr and (d) nitrocarburzed sample at 550°C for 12 hr.
This boronizing atmosphere reacts with the steel surface. Nucleation of boron rich compound on the steel surface is a function of boronizing time and temperature. As the boronizing time increases, thin compact boride layer forms.
Concentration of free boron in this layer determines the growth of iron borides, that is, the growth of Fe2B layer or FeB plus Fe2B layers. Boride layers FeB and Fe2B were formed in all the three boronized specimens.
FeB layer forms over Fe2B layer. Contrast between FeB and Fe2B layer is visible in the optical micrograph (FeB layer appears darker than Fe2B layer). FeB, being undesirable, is formed due to incomplete soaking time and unavailability of boron.
In the figure, three distinct regions are observed (i) Boride layer including borides, (ii) Transition zone relatively softer than substrate, (iii) matrix that is not affected by boron. Thickness of the boronized layer formed on the surface of steel specimens that are boronized at 950°C is ranging from 15 to 90 μm and thickness of nitrocarburized layer is 200 μm.
Growth of boride layer depends upon the availability of boron potential, temperature and time. Diffusion controlled boride layer growth is given by:
d=k (t)1/2
Where, d is boride layer thickness,
t is time,
k is constant which depends upon temperature.
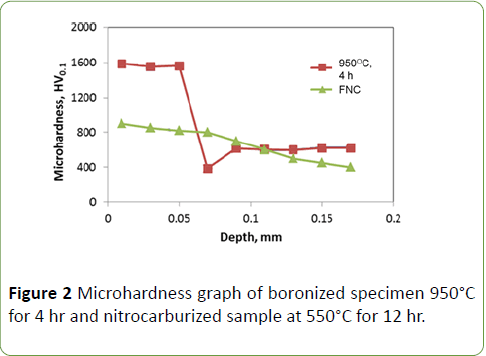
If the elements such as carbon, silicon, and aluminum are present in steel, the formation of transition zone occurs below the Fe2B layer. These elements are not soluble in the iron boride layer. They are pushed from the surface by diffusing boron and displaced ahead of the boride layer into the steel matrix. The displaced elements can form a complex compound iron-silicoborides. As the time progresses, nucleation of FeB phase occurs near the surface region of Fe2B layer and then the transition zone is eaten up by the growing front of Fe2B layer. Microhardness-depth profiles across the cross section of steels specimen boronized at 950°C for 4 hr and nitrocarburized sample are shown in Figure 2. In the current work, microhardness of specimen 950°C for 4 is around 1600-1700 HV0.1 in the boride layer zone and that of in transition zone is around 400 HV0.1. The hardness in the non boronized region is around 500 HV0.1. The nitrocarburized steel showed hardness of 800 HV When compared boronized samples with Nitrocarburized samples; the hardness is much higher in the boronized sample. This hardness can be retained at higher temperatures too.

Figure 2: Microhardness graph of boronized specimen 950°C for 4 hr and nitrocarburized sample at 550°C for 12 hr.
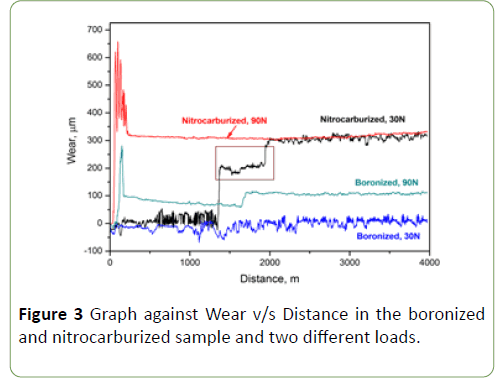
Boronized steel with dual-phase (FeB and Fe2B) structure shows inferior wear properties due to the presence of FeB layer. The specimen boronized at 950°C for 4 hr is used to study wear study due to low temperature, high hardness and absence of FeB layer. Such boronized pin is diamond polished to remove the porous layer present on the specimen surface. Pin on disc test is also performed on the nitrocarburized sample at two different loads that is 30 N and 90 N. Wear is seen maximum in nitrocarburized sample at load of 30 N and 90 N, this can be attributed to variation in hardness of nitrocarburized and boronized specimens. With increase in load, increase in wear was observed. Figure 3 shows maximum wear of nitrocarburized sample at 90 N load.

Figure 3: Graph against Wear v/s Distance in the boronized and nitrocarburized sample and two different loads.
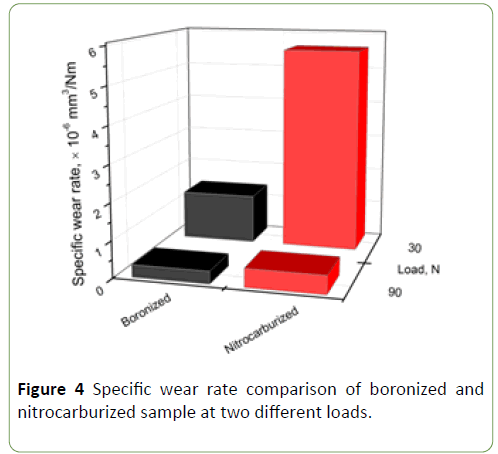
Specific wear rate of normalized and boronized samples shows maximum wear rate in nitrocarburized sample when compared to respective boronized sample at same load. The specific wear rate for boronized specimen is almost half the specific wear rate of nitrocarburized sample.
Figure 4 shows that boronized sample has better wear resistance when compared to nitrocarburized sample [10,11].

Figure 4: Specific wear rate comparison of boronized and nitrocarburized sample at two different loads.
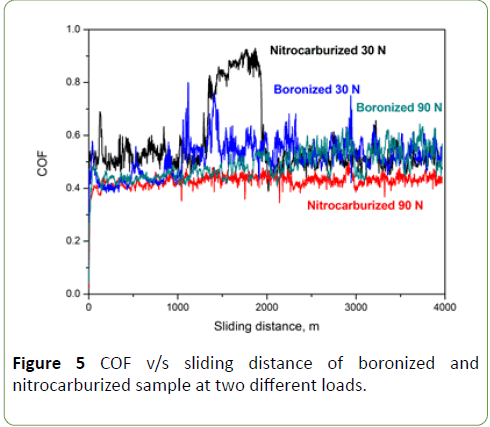
From these results, it is confirmed that wear resistance increases with increasing surface hardness of the steel. From Figure 5, we conclude that an increase in process time increases the thickness of the boride layer, which results in a decrease in wear [5,8,10,11]. When COF values are compared, it is almost same for nitrocarburized and boronized sample. Boronized pin shows 0.40 as COF whereas nitrocarburized pins shows COF from 0.40 to 0.90. The COF remains almost constant for both the specimens. It is ranging from 0.40 to 0.70.

Figure 5: COF v/s sliding distance of boronized and nitrocarburized sample at two different loads.
In case of the boronized pin, COF value remained 0.40 to 0.50, but during the 1000-2000 m sliding distance, COF suddenly increases to 0.80 and drop again to 0.55 and thereafter remains constant. This increase in COF could be due to either wear particle entrapment or asperity flattening. Wear particle generation or asperity flattening must be associated with the disc and not the pin because pin shows polishing wear, and there is no indication of particle removal from the pin surface.
Conclusion
When the above results are taken into consideration, the following conclusions can be derived:
• The surface hardness of the boronized AISI H13 steel was in the range of 1600-1700 HV, the nitrocarburized steel showed hardness of 800 HV while unborided steel hardness was 500 HV.
• Sliding pin on disc wear test of boronized AISI H13 steel pin showed better wear resistance as compared to the nitrocarburized pins at 300°C.
• High hardness of the surface of boronized steel is responsible for the enhanced wear resistance at 300°C.
• Average COF observed for boronized and nitro-carburized was in the range of 0.4-0.7.
• The specific wear rate for boronized specimen is almost half the specific wear rate of nitrocarburized sample.
Acknowledgment
The authors gratefully acknowledge the fully support provided for this work by KCTI, Bharat Forge Ltd. Pune. Finally, the authors would like to express special thanks and gratitude to review committee and top management of Bharat Forge Ltd for providing helpful material and comments as well as granting the permission to publish/present the research work.
References
- Keddam M, Ortiz-Dominguez M, Elias-Espinosa M, Damiain-Mejia O, Arenas-Flores A, et al. (2014) Growth Kinetics of the Fe2B Coating on AISI H13 Steel. Trans Indian Institute Metallurgy 68: 433-442.
- Genel K (2006) Boriding kinetics of H13 steel. Vacuum 80: 451-457.
- Balusamy T, Narayanan S, Ravichandran K, Park IS, Lee MH (2013) Pack boronizing of AISI H11 tool steel: Role of surface mechanical attrition treatment. Vacuum 96: 36-43.
- Xie F, Ye X, Cheng J, Sun L (2013) A study on an energy-saving and high-efficient pack boriding technology for tool and die steels. Physics Procedia 50: 76-81.
- Joshi A, Hosmani S (2014) Pack-Boronizing of AISI 4140 Steel: Boronizing mechanism and the role of container design. Materials and Manufacturing Processes 29: 1062-1072.
- Jurci P, Hudakova M (2010) Diffusion boronizing of H11 hot work tool steel. J Materials Engineering Performance 20: 1180-1187.
- Behrens BA, Brauer G, Paschke H, Bistron M (2011) Reduction of wear at hot forging dies by using coating systems containing boron. Production Engineering 5: 497-506.
- Ulutan M, Mustafa Yildirim M, Celik N, Buytoz S (2010) Tribological properties of borided AISI 4140 steel with the powder pack-boriding Method. Tribol Letter 38: 231-239.
- ASM Handbook 4 (1991) Heat Treating; ASM International: Materials Park, OH, USA.
- Yan W, Dowd O, Busso NP (2007) Numerical study of sliding wear caused by a loaded pin on a rotating disc. J Mech Phys Solids 50: 449-470.
- Sen S, Sen U (2009) The effect of boronizing and boro-chromizing on tribological performance of AISI 52100 bearing steel. Industrial Lubrication Tribol 61: 146-153.

